Fan: Two-point control
Scenario
An IOZER basic reads a 1-Wire temperature sensor and switches a fan through digital output 1. An enable datapoint activates the controller. The temperature setpoint and hysteresis have their own datapoints and can optionally be adjusted through Home Assistant.
The controller runs locally on IOZER. Home Assistant provides display and operation.
Goal
The two-point controller has two output states: fan on and fan off. Hysteresis separates the on and off thresholds so that small temperature fluctuations do not cause constant switching.
This example uses a temperature setpoint of 25 °C and hysteresis of 0.5 K:
| Condition | Action |
|---|---|
| Enable off | Turn the fan off |
Enable on and temperature > setpoint + hysteresis, here > 25.5 °C |
Turn the fan on |
Enable on and temperature < setpoint − hysteresis, here < 24.5 °C |
Turn the fan off |
| Enable on and temperature between the thresholds, including their boundaries | Keep the current fan state |
Here, hysteresis is the offset from the temperature setpoint. With 0.5 K, the two switching thresholds are 1 K apart. Reaching exactly 24.5 °C or 25.5 °C does not trigger a state change.
Hardware used
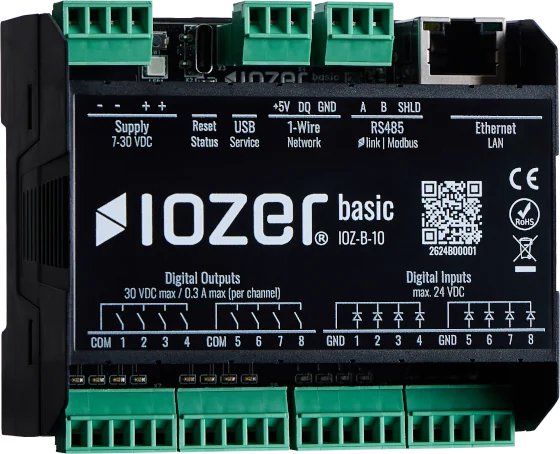
- IOZER basic (IOZ-B-10) with a suitable power supply
- DS18B20 1-Wire temperature sensor
- Fan with a control interface suitable for the output
- Computer with access to the web interface
- Optional: Home Assistant with an MQTT broker
Requirements
- IOZER, the sensor, and the fan are installed according to the safety information and electrical connection instructions.
- I/O & Interfaces are active.
- The saved program is running for local control.
- For optional Home Assistant integration, IOZER and Home Assistant use the same MQTT broker.
Implementation
1. Configure the output and fan datapoint
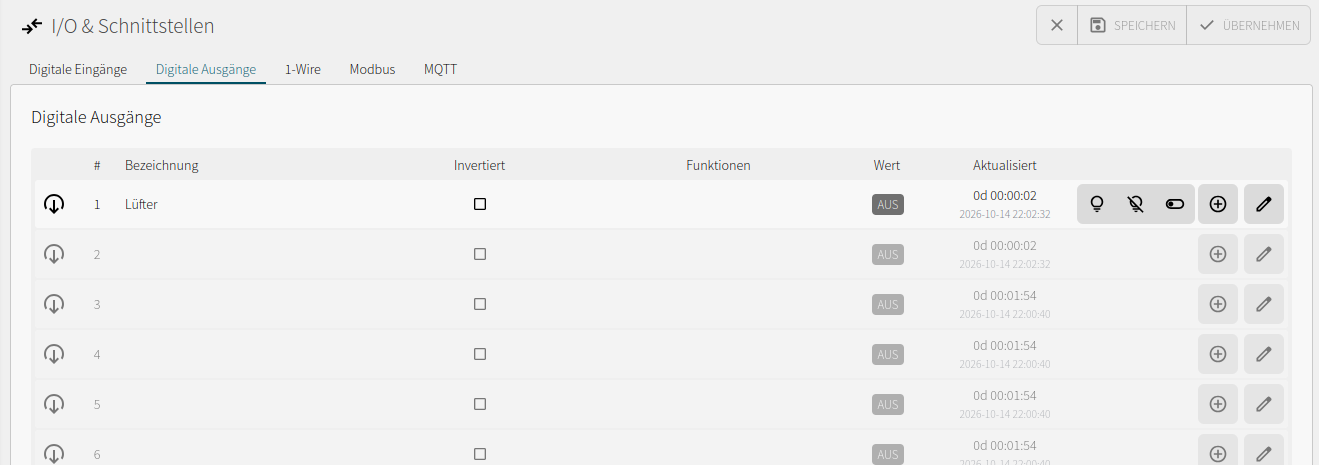
Open I/O & Interfaces → Digital outputs and edit output 1.
| Setting | Value |
|---|---|
| Label | Lüfter |
| Enabled | On |
| Name | luefter |
| Inverted | Off |
| Initial state | Off |
| Stop state | Off |
| Auto-off | Disabled |
| Flashing | Disabled |
Save and apply the output configuration. Then create its datapoint under Datapoints or using the plus icon in the output row:
| Setting | Value |
|---|---|
| Label | Lüfter |
| Name | luefter |
| Data type | Boolean (Bool) |
| Data source | Digital output → Lüfter → State |
| Data target | Digital output → Lüfter → State |
The data source provides output feedback. The logic controls the data target using dp.set("luefter", true) or dp.set("luefter", false). Automatic forwarding of source values to the target is not required for these commands.
Labels and technical names match the German screenshots. Keep the technical names shown here when using the JavaScript examples. Further settings are described under Digital outputs.
2. Configure the temperature sensor and datapoint
Navigate to I/O & Interfaces → 1-Wire. Run sensor discovery if necessary and add the DS18B20 to the configuration.
| Setting | Value |
|---|---|
| Read interval | 5 seconds |
| Sensor type | DS18B20 |
| Sensor label | Temperatur |
| Enabled | On |
| Temperature value | Enabled, factor 1, offset 0, unit °C |
Use the hardware address of your connected sensor. The address in the screenshot belongs to the example setup.
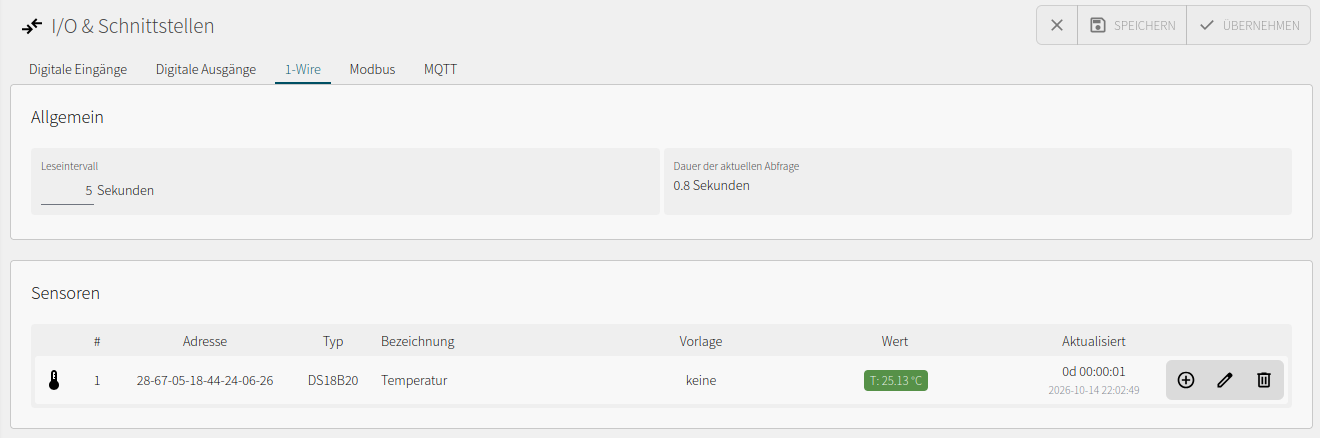
Create the temperature datapoint using the plus icon in the sensor row or under Datapoints:
| Setting | Value |
|---|---|
| Label | Temperatur |
| Name | temperatur |
| Data type | Float |
| Unit | °C |
| Classification | Temperature |
| Read only | On |
| Data source | 1-Wire → Temperatur → Temperature value |
| Data target | None |
Save and apply the configuration. The datapoint must show a plausible measurement with status OK and update regularly. See 1-Wire for details.
3. Create enable, hysteresis, and setpoint datapoints
Under Datapoints, create three more datapoints without a data source or target. Their values are set by the program or operator.
| Label | Technical name | Data type | Unit | Example starting value |
|---|---|---|---|---|
Lüfter Freigabe (fan enable) |
luefter_freigabe |
Boolean (Bool) |
None | false |
Hysterese (hysteresis) |
hysterese |
Float |
K |
0.5 |
Solltemperatur (temperature setpoint) |
solltemperatur |
Float |
°C |
25 |
Enable these datapoints and leave Read only off. Use a positive hysteresis value. The program start event in step 4.1 sets the starting values.
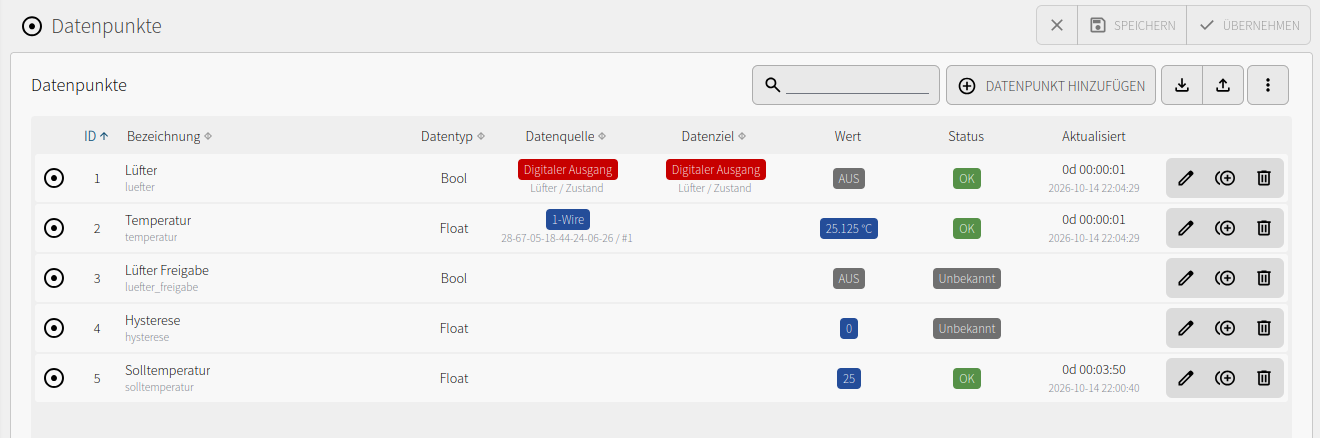
The screenshot shows an intermediate state: enable and hysteresis still have status Unknown, and hysteresis shows 0. All three settings must be valid after the program starts. Datapoint IDs may differ; the following programs use technical names.
4. Create events and control logic
Open Program. Each event can use Blockly or JavaScript as an alternative.
4.1 Set starting values
Create an enabled Program → Start event. In Blockly, use four Set datapoint value blocks to set enable to false, the fan to false, hysteresis to 0.5, and the temperature setpoint to 25.
Alternatively, enter this JavaScript code:
dp.set("luefter_freigabe", false);
dp.set("luefter", false);
dp.set("hysterese", 0.5);
dp.set("solltemperatur", 25);
This example resets these values on every program start. Enable must be switched on deliberately after startup. To retain settings across restarts later, use datapoint persistence and initialize only values for which dp.get does not return a valid value.
4.2 Run the controller on temperature updates
Create an enabled Datapoint → Value updated event with Temperatur as its source. This runs the controller on every successful measurement update, even if the temperature has not changed.
Build the following Blockly logic:
- In an if/else block, check whether Lüfter Freigabe is
true. - In its do section, compare Temperature > Setpoint + Hysteresis. If the condition is met, set Lüfter to
true. - Below it, add a second if block for Temperature < Setpoint − Hysteresis. If the condition is met, set Lüfter to
false. - In the outer else section, set Lüfter to
false.
The inner comparisons have no else branch. This keeps the previous output state inside the hysteresis band. Use Set value so that an unchanged temperature does not toggle the fan on every measurement.
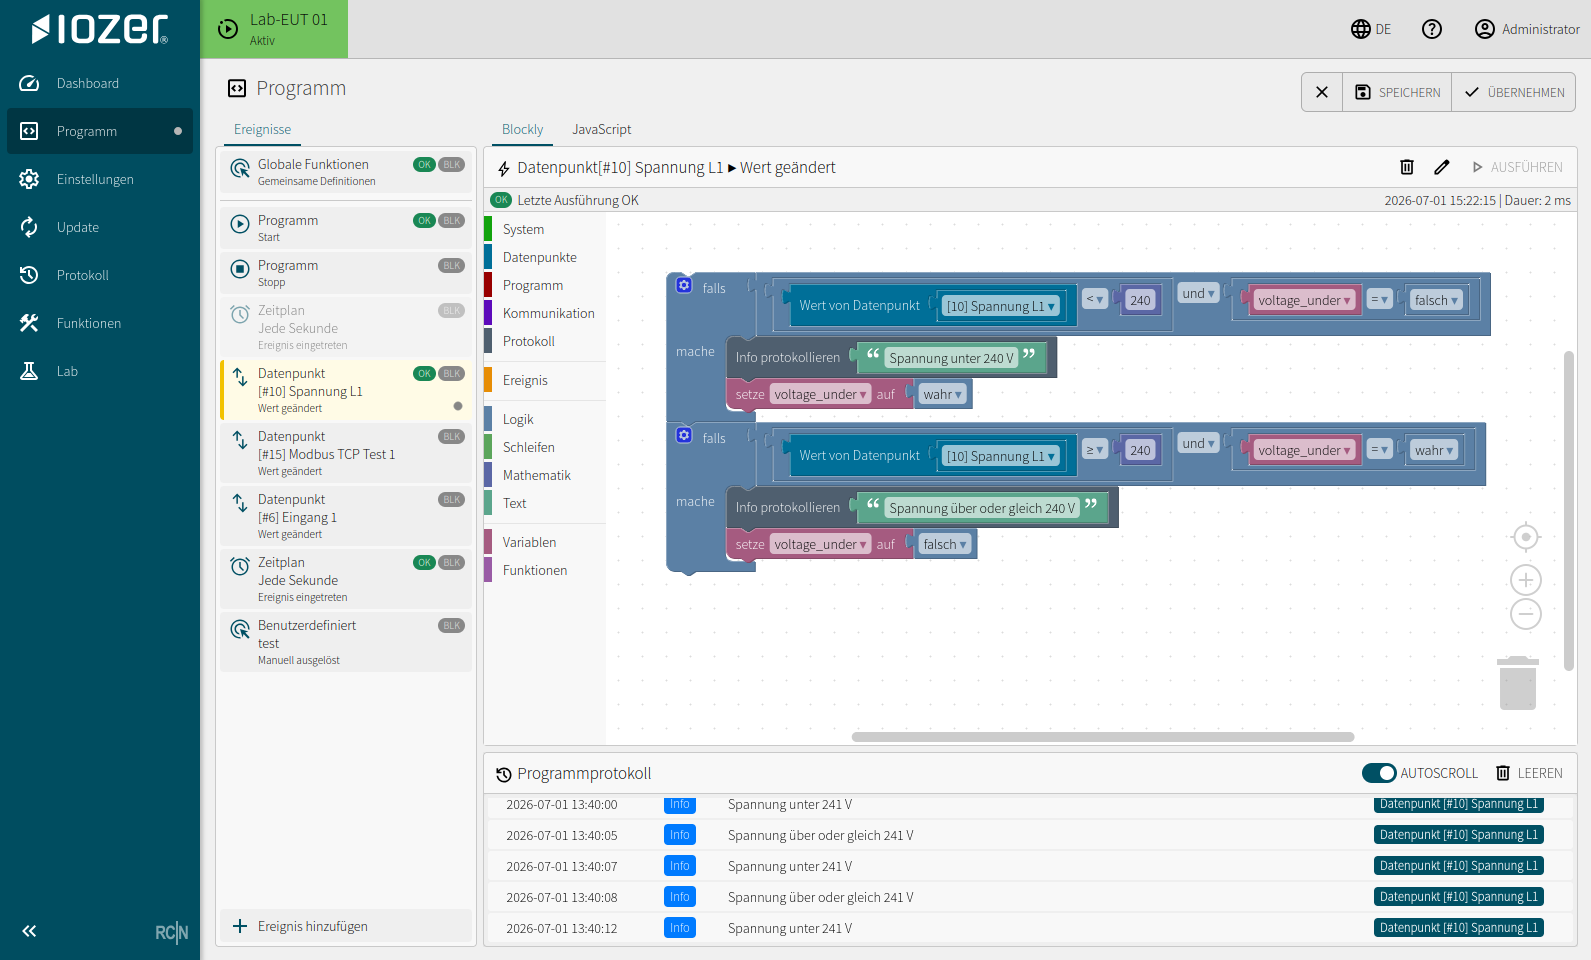
The JavaScript alternative additionally checks for valid numbers and positive hysteresis before comparing temperatures:
if (dp.get("luefter_freigabe", false)) {
  const temperatur = dp.get("temperatur");
  const solltemperatur = dp.get("solltemperatur");
  const hysterese = dp.get("hysterese");

  if (typeof temperatur = "number" &&
      typeof solltemperatur = "number" &&
      typeof hysterese === "number" && hysterese > 0) {
    if (temperatur > solltemperatur + hysterese) {
      dp.set("luefter", true);
    }
    if (temperatur < solltemperatur - hysterese) {
      dp.set("luefter", false);
    }
  }
} else {
  dp.set("luefter", false);
}
If numeric values are missing, this JavaScript variant makes no new temperature decision. If enable is off or invalid, it turns the fan off.
4.3 Respond to operator changes
Create three more enabled events using the same control logic from step 4.2:
| Trigger | Datapoint | Purpose |
|---|---|---|
Value changed |
Lüfter Freigabe |
Evaluate enable changes directly |
Value changed |
Hysterese |
Apply new switching thresholds directly |
Value changed |
Solltemperatur |
Apply a new setpoint directly |
These events respond to changes from Home Assistant, for example. The logic reads current datapoint values each time and needs no continuous loop or delay.
Save and apply the program. Start it with I/O & Interfaces active, then check the initialized values and event execution status. See Events and JavaScript for triggers and device functions.
5. Optional: Operation through Home Assistant
Under I/O & Interfaces → MQTT, configure and enable the connection to the shared broker. Then open Datapoints → ⋮ → Home Assistant AutoDiscovery.
Select the five datapoints and use the mapping shown in the screenshot:
| Datapoint | Home Assistant type | Minimum | Maximum | Step |
|---|---|---|---|---|
Lüfter |
Automatic (Switch) |
— | — | — |
Temperatur |
Automatic (Sensor), read only |
— | — | — |
Lüfter Freigabe |
Switch |
— | — | — |
Hysterese |
Number input |
0.5 |
5 |
0.5 |
Solltemperatur |
Number input |
20 |
30 |
0.5 |
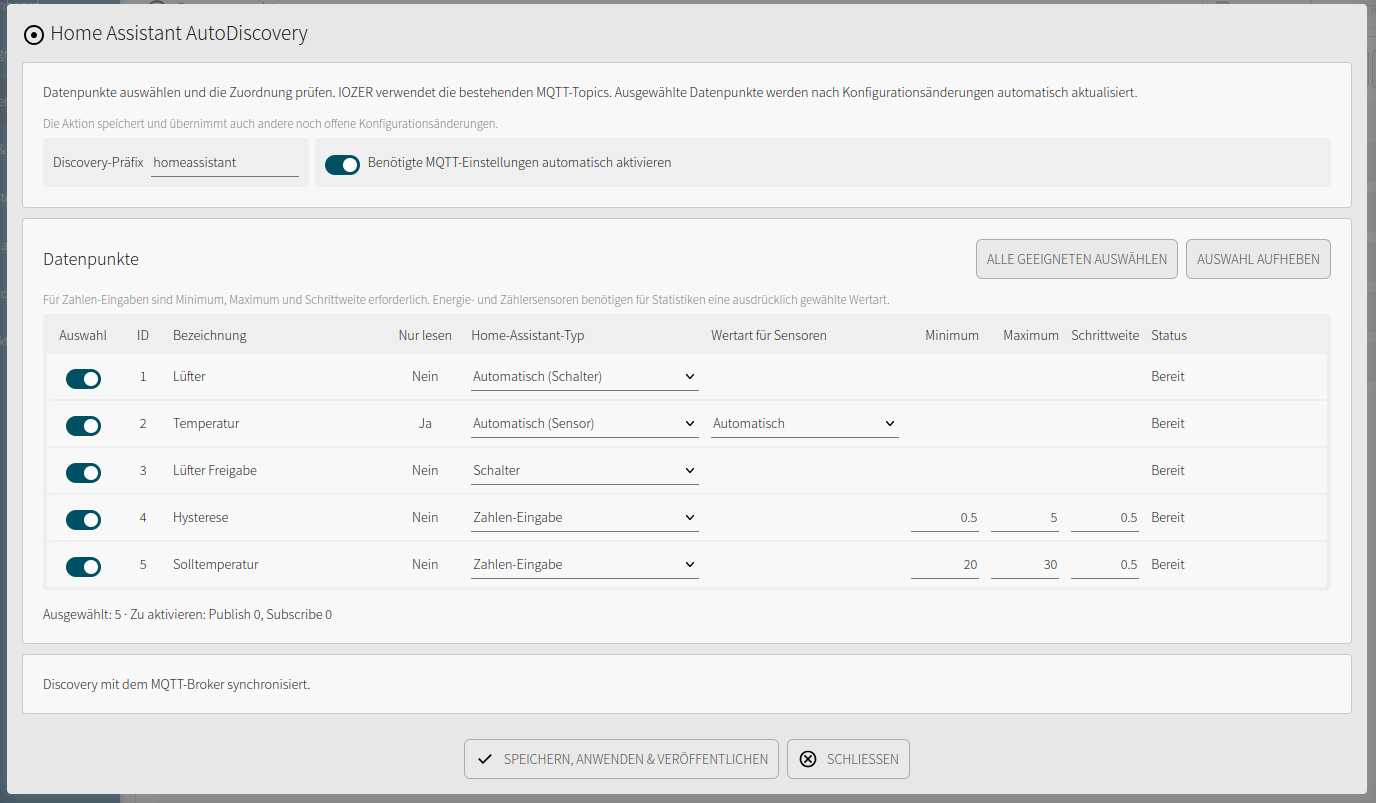
Leave the discovery prefix at homeassistant if that is what your installation uses. Enable Automatically enable required MQTT settings, review the changes, and choose Save, apply & publish. This action also applies other pending configuration changes.
After publication, you can display the temperature, activate the controller through Lüfter Freigabe, and adjust the setpoint and hysteresis. Switching Lüfter directly sets the output; local control may change that state again on the next evaluation. Use enable for normal operation.
Setup is described in detail under Home Assistant and MQTT.
Verify operation
Use a 25 °C setpoint and 0.5 K hysteresis. Enable the controller after program startup, for example through Home Assistant. To test without Home Assistant, create a custom event with the following JavaScript code and run it once using Run:
dp.set("luefter_freigabe", true);
To disable the controller, set the value to false. Creating such events is described under Events.
| Check | Expected result |
|---|---|
| Enable off, any valid temperature | Fan off |
Enable on, raise the temperature to about 26 °C |
Fan on |
Then lower the temperature to 25 °C |
Fan stays on |
Lower the temperature further to about 24 °C |
Fan off |
Then raise the temperature back to 25 °C |
Fan stays off |
| Disable while the fan is running | The enable event turns the fan off |
| Change the setpoint or hysteresis | The controller uses the new thresholds |
For temperature changes, wait for the next sensor update. The configured read interval polls the sensor every five seconds. Check output feedback and event execution status.
Troubleshooting
| Symptom | Possible cause and check |
|---|---|
| Temperature is missing or invalid | Check active I/O, 1-Wire wiring, the sensor address, and the temperature datapoint. |
Enable or hysteresis has status Unknown |
Create the program start event, save, apply, and restart the program. |
| Fan stays off despite high temperature | Check enable, the running program, and the upper threshold. In this example, the temperature must exceed 25.5 °C. |
Fan stays on at 25 °C |
This is inside the hysteresis band; the fan turns off only below 24.5 °C. |
| Fan toggles on every measurement | Set values using dp.set; replace any toggle block used by mistake. |
| Operator changes take effect only later | Add the three events from step 4.3 or check their datapoint assignments. |
| A datapoint command does not switch the output | Check data target Digital output → Lüfter → State, output activation, and I/O. |
| Home Assistant entities are missing or unavailable | Check MQTT connectivity, discovery selection, and valid datapoint values. |
Result and extension
IOZER controls the fan using two temperature thresholds. Enable turns the controller on and off, while the setpoint and hysteresis remain adjustable datapoints. Home Assistant adds display and operation to the local controller.